One of the most important parts of pool care maintenance is adequate circulation and filtration. In order for your filter to be working at its peak, it will need to be occasionally cleaned. There are different types of filters and different methods of cleaning them. Backwashing as needed and routine chemical cleaning is absolutely necessary to keep your pool crystal clear all season. Here is a brief overview of each type of filter, and how to effectively clean them.
Cartridge Filters
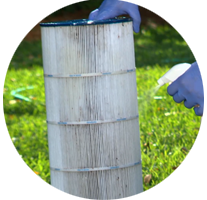
Cartridge filters have a pleated cartridge that filters debris and contaminants from the water. When the pleats become full of dirt and debris, the filter pressure will
rise. *Make note of the pressure after chemically cleaning your cartridge. This is called the starting pressure, and what you will use to gauge when your filter is needing chemical cleaning. When the filter pressure rises 10 PSI over your starting pressure, you will need to take the cartridge out and chemically clean it.
*Filter elements are too heavy for safe lifting when wet and dirty. To avoid back injury, clean and drain elements as far as possible in operating position in the filter tank. Have two people lift elements and lift with care.
*POOL FILTERS AND EQUIPMENT OPERATE UNDER HIGH PRESSURE. Please see the user manual for your specific filter regarding safe disassembly. These are general guidelines.
- Stop Pump. Open the air relief valve to release all pressure from the inside of the tank and system.
- Close the plumbing inlet and return valves to prevent flooding.
- Remove the filter drain plug and drain all water from the tank.
- Open the filter, being careful to keep the tank o-ring in place. Be careful not to damage the o-ring.
- With a garden hose, hose as much dirt as possible off of filter elements while they are still in place inside the tank. Allow the tank to drain completely. Make sure that wastewater disposal complies with local codes and ordinances.
- Carefully and safely lift out the filter element and hose it down thoroughly. Allow to drain.
- Spray or soak the filter element with BioGuard Strip Kwik for a minimum of two hours. Rinse thoroughly until the water runs clear.
- Spray or soak the filter element with BioGuard Kleen It for a minimum of two hours. Rinse thoroughly until the water runs clear.
- Reinstall the element into the tank and secure it tightly.
- Open the air relief valve and start the pump.
- When a steady stream of water comes from the air relief valve, close the valve.
- After the filter is operating, record filter pressure gage reading in the owner’s manual for future use.
Diatomaceous Earth (DE) Filters
DE Filters have different types of internals. Some come with a grid-type filter with 8 flat or curved grids in a manifold that can be taken apart to clean. Some have a pleated cartridge, and some have flexible tubes, or “fingers”. No matter the type, The DE powder is actually what catches particulates and debris and filters the water. With DE Filters, when the filter pressure rises 10PSI over the starting pressure, most DE filters have the ability to backwash. Backwashing is essentially a quick clean of the filter and removes abuot 75% of the DE and dirt in the filter. After every backwash, you will need to add more DE to replenish what was lost. Backwashing is enough to keep the filter clean enough for a short time, but we recommend taking the filter apart and chemically cleaning at least twice per season (at opening/closing and around the 4th of July) and after treating any kind of water quality issue. This can include metal treatments, flocculant treatments, algae blooms, and cloudiness.
*POOL FILTERS AND EQUIPMENT OPERATE UNDER HIGH PRESSURE. Please see the user manual for your specific filter regarding safe disassembly. These are general guidelines.
- Backwash filter
- Stop the pump.
- Open air relief valve to release all air pressure from inside of tank and system.
- Remove the filter drain plug and drain all water from the tank.
- Open the filter, being careful to keep the tank o-ring in place. Be careful not to damage the o-ring.
- With a hose equipped with a soft flow nozzle, wash as much dirt as possible off of the filter module while it is still inside the tank. Allow tank to
drain completely. - Make sure that the inside of the tank is clean. Lift out the module and hose it down thoroughly. Spray the entire module surface. Allow module to drain.
- Inspect the module. If necessary, repeat the washing operation. If the module is damaged, replace it.
- Inspect and clean the air bleed filter at top of the module.
- Reinstall the module into the tank and secure it tightly.
- Open the air relief valve and start the pump.
- When a steady stream of water comes from the air relief valve, close the valve.
- After the filter is operating, record filter pressure gage reading in the owner’s manual for future use.
- Add DE. DE amount requirement is printed on the filter tank.
Sand Filters
As the name suggests, Sand Filters are filled with sand that filters the water. The rough edges of the sand catch debris as it flows through. When the sand becomes clogged with dirt and debris, water flow is slowed and the filter pressure will rise. Unlike DE and Cartridge filters, Sand filters work better (to an extent) when it’s a little dirty. When the filter pressure rises 10-12 PSI over the starting pressure, it is time to backwash. Backwashing is enough to keep the filter clean enough for a short time, but we recommend taking the filter apart and chemically cleaning at least twice per season (at opening/closing and around the 4th of July) and after treating any kind of water quality issue. This can include metal treatments, flocculant treatments, algae blooms, and cloudiness.
*POOL FILTERS AND EQUIPMENT OPERATE UNDER HIGH PRESSURE. Please see the user manual for your specific filter regarding safe disassembly. These are general guidelines.
Backwashing
1. Stop the pump.
2. Ensure that the suction and backwash lines are open so that water is free to come from the pool and flow out the backwash line. Set control valve to “Backwash” position.
3. STAND CLEAR OF FILTER and start the pump.
4. Backwash filter for approximately three (3) minutes or until the backwash water running through the sight glass is clean.
5. Stop the pump and set the valve to the “Rinse” position.
6. STAND CLEAR OF FILTER and start the pump.
7. Rinse filter for approximately 30 seconds.
8. Stop the pump and set the valve to the “Filter” position.
9. Ensure the pool return line is open so that water may flow freely from the filter back to the pool.
10. Open the manual air bleeder on the filter. STAND CLEAR OF FILTER and start the pump.
11. Close manual air bleeder on the filter when a steady stream of water emerges from the bleeder.
12. The filter has now started its filtering cycle. Verify the water is returning to the pool and take note of the filter pressure.
13. The filter pressure in Step 12 above should not exceed the pressure originally observed on the filter when it was initially started. If after backwashing, the pressure is 4 to 6 psi above the
starting pressure it will be necessary to chemically clean the sand bed.
Chemically Cleaning The Sand Bed
It is recommended that a specialty filter cleaning solution like BioGuard Strip Kwik and Kleen It be used. These cleaners will remove oils, scale, and rust from the sand bed.
2. Mix the solution following the manufacturer’s instructions on the label.
3. Backwash the filter with the valve as described above.
4. If the filter is below pool level, switch the pump off and close the appropriate valves to prevent draining the pool.
5. Switch off-pump, open filter drain, and allow the filter to empty. Place valve in “Backwash” position.
6. After the filter has drained, close the filter drain and remove the pump strainer pot lid.
7. Be sure the backwash lines are open.
8. Switch the pump on and slowly pour the cleaning solution into the pump strainer with the pump running. If the filter is below the pool, open the shut off valve slightly to allow the pump to run.
9. Continue adding solution until the sand bed is saturated with cleaning solution.
10. Switch off the pump and leave the filter in the “Backwash” position. Allow the filter to stand overnight (12 hours).
11. Replace the pump lid and follow the backwash procedure as described above.
12. Do not allow cleaning solutions to get into the pool.
Different manufacturers and chemicals may have different recommendations. These are general guidelines, and we recommend you also read any instructions specific to your equipment.